Neptune 1.0 Beta 3 Documentation: Hello World
Neptune Information
Hello World
Based on Dan Wilson's "So you want to build a ModelGlue:Unity application (Part 2)" (and the CFWheels version).
The traditional "Hello World" is a good place to start. Here, we are going to create a very basic page that says "Hello World".
Once Neptune is installed, start by creating a file called hello.cfm with the following code:
<h1>Hello World!</h1>

<p>This is just a very basic "Hello World" page.</p>
Now browse to that page in your site and you should see "Hello World" on the page.
That's it!
What about Layouts?
OK. Maybe "That's it" was too simple. The page works, but doesn't have any HTML structure or design to it. Here it is using a layout:
<cf_Template title="Hello World!" showTitle="true">

<p>This is just a very basic "Hello World" page.</p>

</cf_Template >
If you want a different <h1> on your page than your page title, then set the "showTitle" attribute to "false".
<cf_Template title="Hello World!" showTitle="false">

<p>This is just a very basic "Hello World" page.</p>

</cf_Template >
The default layout can be found in /layouts/Default.cfc:
<cfcomponent displayname="Default Layout" extends="Base">
<cffunction name="body" access="public" output="yes">
#super.body()#
</cffunction>
<cffunction name="end" access="public" output="yes">
#super.end()#
</cffunction>
</cfcomponent>
In the initial code from the Neptune repository, the Default layout gets its output by extending the Base layout (Base.cfc), but you can change that in your site.
<cfcomponent displayname="Base Layout" extends="layout">
<cffunction name="head" access="public" output="yes">
<cfargument name="title" type="string" required="yes"><cfset variables.me.title = arguments.title>
<cfcontent reset="Yes"><!doctype html>
<html class="no-js" lang="en">
<head>
	<title>#arguments.title#</title>
</cffunction>
<cffunction name="body" access="public" output="yes">
</head>
<body>
</cffunction>
<cffunction name="end" access="public" output="yes">
</body>
</html>
</cffunction>
</cfcomponent>
Now we'll add a banner and navigation menu to our layout by placing it in the "body" method right after the BODY tag.
<div id="banner">Contact-O-Matic</div>
<ul id="navlist">
	<li><a href="index.cfm" <cfif variables.FileName IS "index.cfm">id="current"</cfif>>Home</a></li>
	<li><a href="contact-list.cfm" <cfif variables.FileName IS "contact-list.cfm">id="current"</cfif>>Contact List</a></li>
	<li><a href="contact-edit.cfm" <cfif variables.FileName IS "contact-edit.cfm">id="current"</cfif>>Contact</a></li>
</ul>
We'll add some style to our Contact-O-Matic by turning our navigation into tabs using a css file from listamatic. Copy the CSS and put it in a menu.css file in the root of your site then reference it from your layout:
<link rel="stylesheet" type="text/css" href="/menu.css" media="screen" />Our full layout file looks like this:
<cfcomponent displayname="Default Layout" extends="layout">
<cffunction name="head" access="public" output="yes"><cfargument name="title" type="string" required="yes"><cfset variables.me.title = arguments.title>
<cfcontent reset="Yes"><!doctype html>
<html class="no-js" lang="en">
<head>
<title>#arguments.title#</title>
<link rel="stylesheet" type="text/css" href="/menu.css" media="screen" />
</cffunction>
<cffunction name="body" access="public" output="yes">
</head>
<body>
<div id="banner">Contact-O-Matic</div>
<ul id="navlist">
<li><a href="index.cfm" <cfif variables.FileName IS "index.cfm">id="current"</cfif>>Home</a></li>
<li><a href="contact-list.cfm" <cfif variables.FileName IS "contact-list.cfm">id="current"</cfif>>Contact List</a></li>
<li><a href="contact-edit.cfm" <cfif variables.FileName IS "contact-edit.cfm">id="current"</cfif>>Contact</a></li>
</ul>
</cffunction>
<cffunction name="end" access="public" output="yes">
</body>
</html>
</cffunction>
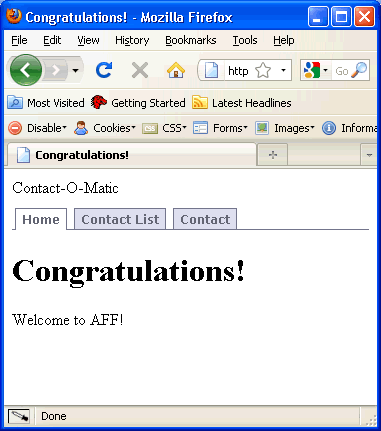
</cfcomponent>The index.cfm page should now look like this:
One advantage of this approach is that it is easy to can add code into the HEAD of your page. For more information, read about Layout Components (which can be used separately from Neptune).
This is fun stuff! We created a basic page with a layout and a menu. Now let's make a list and a form to manage contacts data.
Next: Manage Data